How To Grow Horseradish

July 7th, 2011

Horseradish Blossoms

What Is Horseradish

Horseradish is a hardy perennial plant grown mostly for its roots.  It is a zesty member of the mustard family.

Horseradish has a long white root, and large oblong leaves that make it attractive planted at the back of perennial borders and garden beds.

The pungent root of the horseradish plant is what’s most commonly eaten.

The horse radish plant blooms in early summer with masses of small white blooms on 2 to 3 foot high stems.  The blossoms of the horseradish plant are pleasantly fragrant.

Latin nameArmoracia rusticana

Planting and Growing Horseradish

Horseradish, once planted, should last for years in your garden.  The exception being if you live in an area with extremely cold winters, or year-round summers.

Start horseradish plants by planting a horseradish root  about 12 inches deep.  Use a root about 8 or 9 inches in length.

Before planting, deeply cultivate the soil in early spring.  Add compost or manure to the soil.  Then, plant the horseradish roots about 12– 18 inches apart.

Keep the area weeded to give your horseradish the best chance of establishing itself in your garden.

Horseradish will return each year, and the clump will spread via underground shoots.  Any horseradish root un-harvested will sprout back into a new plant the following year.

It is rare that you will need to re-purchase horseradish once you have initially planted it.  Even small pieces of the root left behind in the soil will produce another plant.

Exceptions:
1.  If you live in an area so cold that horseradish roots will not survive through the winter or
2.  If you live in an area that is too hot, as horseradish requires a period of cold dormancy.

In these cases, grow horseradish as an annual.

As a guideline, horseradish grows extremely well in plant hardiness zone 5, and will tolerate weather conditions from plant hardiness zones 2 through 9.

Horseradish likes moist soil and full sun.   Horseradish is a very adaptable plant though, and I found that it grows perfectly fine in a partially sunny area of my garden.

Once established, horseradish requires very little care.  I took a root of horseradish from my mother about 15 years ago, and my horseradish clump is still going strong.

Horseradish can become invasive in some gardens. If this is the case in your garden, be sure to carefully dig out all sections of root in the area you don’t want more horseradish plants.

Harvesting and Storing Your Horseradish

Harvest your horseradish in late fall – October and November.  You can keep harvesting your horseradish until the ground freezes.

Alternately, you can also harvest your horseradish in early spring, before there is much new growth.

Then, there is my mother’s harvesting schedule.  She just digs up some horse radish whenever she wants to use it – early spring for Easter morning, throughout the summer (even when the horseradish plant is blooming), and throughout the fall until the ground freezes solid.  Works for her.

Most of the root growth occurs later in the growing season.  So, until your horseradish patch is well established, I suggest waiting until the fall to harvest your horseradish.

Store your horseradish roots packed in dry sand in a cool dark location — cold cellar or garage work well.

Horseradish will also keep in the crisper drawer in the refrigerator.

To your herb garden success,
Herb Garden Gal

Copyright © 2011 www.HerbGardenGal.com.  All rights reserved.

_________

Want to use this article in your Ezine or Website?  You can, as long as you include the complete article and the Copyright information.

Grow Genovese Basil In Your Italian Herb Garden

June 24th, 2011

Basil has been widely grown in the Mediterranean for centuries, and is the first herb most people think of in an Italian Herb Garden.

And, Genovese basil –originating from the Genoa region of Italy — is the hands-down favourite basil in many Italian herb gardens.

Genovese basil leaves are large and sweet.  This basil is also highly aromatic, with that distinct basil aroma that makes you dream of Italian food.

Botanical Name:  Ocimum Basilicum Genovese

How To Grow Genovese Basil

Genovese Basil is an annual herb — a tender annual in much of the northern hemispheres.  It is one of the most popular herbs grown today in home gardens.

Grow Genovese Basil From Seed

Genovese Basil grows easily from seed.  Sow outdoors in the spring when all danger of frost has passed.

Cover seeds with a thin layer of soil (1/8”), and gently press the soil where you have sown the Genovese basil seed so the soil and seed make contact.

Keep the seeds moist constantly until they have sprouted.

Genovese basil may also be started indoors from seed and transplanted into the garden when all danger of frost has passed.

Transplanting Your Genovese Basil

Wait until all danger of frost is past before permanently planting your Genovese basil into the garden.  This applies whether you are transplanting your own basil seedlings or nursery-bought basil plants.  Frosts and low temperatures at night can destroy a basil plant in one night.

Genovese Basil In Containers

Genovese basil also grows well in containers.  Grow a few Genovese basil herb plants in a pot on the backyard deck or windowsill , for easy access just outside your kitchen.  The closer your basil is to your kitchen, the more you will be inclined to use it.

As Your Genovese Basil Grows

Genovese basil likes full sun, but can tolerate light shade.  It prefers moist, rich, well-drained soil.  After planting your basil, add compost to enrich the soil.

Basils likes to be pruned, and Genovese basil is no exception.  To encourage bushy plants, and extend the productivity of your Genovese basil plant, prune your basil plant regularly.  And of course, there are many wonderful culinary uses for the pruned pieces of this wonderfully fragrant herb.

Keep your Genovese basil plant from flowering.  When a flowering spike begins forming, cut off the top of the stem along with at least one set of leaves.

How To Harvest Genovese Basil

Harvest your Genovese basil by cutting at the stem.  Leave at least two leaves on the stem to encourage new growth.

By cutting off stems of basil, rather than plucking individual leaves off the stem, your basil plant will grow bushier, and you will increase your supply of basil.  Remember, basil is an herb that likes to be pruned.

Using Your Genovese Basil in the Kitchen

Its sweetness and fragrant aroma makes Genovese basil THE basil for fresh dishes.  Young Genovese basil leaves have the brightest sweetest flavour.

This superb basil is the classic basil used for pestos.  It is also an excellent basil to use in Caprese salad.

Genovese basil is a versatile herb that can be added to pasta sauces, pizzas and  stews.   Chicken and fish dishes are also enhanced with the addition of chopped Genovese basil.

Genovese basil also freezes well for winter use.  Note that  when you freeze basil, it will turn dark.

Frozen basil is best used in cooked dishes, added to the dish right from its frozen state.

Have fun growing and eating this Italian kitchen garden staple – Genovese basil herb.

To your herb garden success,
Herb Garden Gal

Copyright © 2011 www.HerbGardenGal.com.  All rights reserved.

_________

Want to use this article in your Ezine or Website?  You can, as long as you include the complete article and the Copyright information.
Hardening Off Herb Plants In Spring and Early Summer

June 9th, 2011

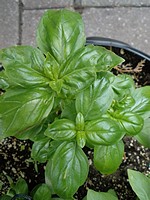
Whether you purchase your herb plants from the nursery, or start your herbs from seed indoors, you will need to harden them off (get them acclimatized to being outside).

Why Harden Off Your Herb Plants

Herb plants grown indoors live in a sheltered environment.  These plants need to get accustomed to the outdoor elements, especially strong light from the sun, and the wind.

Herb plants purchased from a nursery have usually been raised indoors in a greenhouse and also need to get acclimatized to the outdoors.

What Happens If You Don’t Harden Off Your Herb Plants

If you don’t harden off your indoor and greenhouse grown herb plants before permanently moving them outside, the plants stand a much smaller chance of surviving once they are outdoors.

  • Tender herb plants are likely to be destroyed by the elements:
  • Herb leaves get burned by the sun
  • Herb plants can’t withstand the wind, with the weak stems breaking
  • A strong rainstorm knocks down the herb plants
  • Young herb plants wilt beyond recovery

The over-stressed herb plants that do survive usually remain weak and less productive than they otherwise would have been.

If you placed your herb plants outside in a constantly shaded spot that was sheltered from the wind, and from downpours, your tender herb plants might be OK.  Certainly your losses will be much smaller than leaving the plants out in the open.

How To Harden Off Herb Plants

The standard method of hardening off any herbs that were raised indoors, is to take the plants outside for a brief period of time the first day, and leave them out progressively longer each day.

A general guideline is to start with two hours in a protected shady spot, and extend the time the herb plants are out by two hours each day, gradually increasing sun exposure.  After 5 or 6 days, you can leave the herb plants out overnight.

Ideally, start hardening off your herbs on a calm, cloudy day.  Of course, the weather rarely cooperates.

Place plants in a shady sheltered area – use barriers to create shade and shelter if you do not have a suitable outdoor area.

The garage is also a good place to use for hardening off herb plants initially.  Ideal if it’s very windy outside.    Place your plants in the garage with the garage door open, and leave them in there while you are out and about doing your yard work.

When To Bring Your Herb Plants In:

  • Your herb plants are drooping or look like they’re struggling
  • The weather is not cooperating – especially strong sun, high winds, and storms
  • The temperature is expected to drop significantly at night,
  • There is danger of frost

5 Tips For The Time Challanged

Problem is, most of us work all day.  So what to do?

1. Some time is better than no time. Any time spent hardening off your herb plants before leaving them out permanently increases your herb plants’ chances of surviving and thriving.

2. Begin after work.  Take your herb plants outside for a couple of hours when you come home from work.  This is actually a good time to start hardening off herb plants as the sun is less strong, and the wind tends to die down in the evenings.

3. Cut yourself some slack.  If you get home from work too late, just skip the day and continue hardening off your plants the next day.  It’s not worth stressing about it, and your herb plants will be fine.

4. Use the weekend to your advantage.  Start hardening off your herb plants after work on weekdays.  Then leave them out for longer periods of time over the weekend.  They should be ready to leave out all day in a sheltered area, come Monday.

5. Protect, protect, protect.  Once you are leaving your herb plants out for the entire day, make sure you protect them well with barriers to shelter them from the elements.  Because you won’t be home should the weather turn, make sure they are protected even if the forecast calls for a mild overcast day.

Hardening Off Overwintered Tender Perennial Herbs

If you brought your tender perennial herbs indoors for the winter, they too need to be hardened off before you leave them outside for the summer.

All winter, your herbs have been exposed to lower light conditions, and no wind.  The growth on the herb plants is usually noticeably weaker.

Problem is, these are mature plants, sometimes even small trees (e.g. bay laurel), which makes them heavy to lug in and out of the house each day.

If you can, use a trolley or a wagon.  You could even wheel your herbs in and out daily without removing them from the wagon.

These mature herb plants usually require less time to harden off than young herb seedlings.  Still, don’t rush the process.  Gage the hardening off time by how your tender perennial herbs are responding to being in the outdoors.

Final Note

At the end of the day, whether you are hardening off young herb plants or mature herb plants, let the plants be your guide.  If they are looking droopy or you notice the leaves are starting to burn, move them into a more protected shady area or bring them indoors.  If your herb plants are standing strong, you can leave them out a little longer.

Happy growing,
Herb Garden Gal

Copyright © 2011 www.HerbGardenGal.com.  All rights reserved.

Spring Herb Salad From Your Herb Garden

May 13th, 2011

One of my favorite meals in the spring is a salad made with really young spring herbs from the garden.

After a long winter, spring salads using fresh herbs from the herb garden taste so lively.  The flavors are fresh and vibrant.  I feel good whenever I eat this salad — it’s super flavorful and feels like I’m feeding my body with healthful ingredients.

Economical and delicious, spring herb garden salads are so simple to make.  A little bit of this, a little bit of that, and soon the salad bowl is full of herbal goodness.  Every time you make this salad, you’ll be rewarded with a different flavor profile.

Ingredients for Spring Herb Salad

Perennial herbs, and annual herbs whose seeds have self-sown are the base for these herb salads.  Pick small perennial herbs sparingly.  Annual herbs that have self-sown over-abundantly, or in areas you don’t want them, are little treasures to add to your herb garden salads, as you weed them out.

In my latest herb salad concoction, I started with some romaine lettuce left over from the previous night’s dinner.  I went foraging in my herb garden for the remaining salad ingredients.  I picked bloody dock, chives, garlic chives, bronze fennel, oregano, tarragon and mint.

Dressing Your Herb Garden Salad

The spring herb salad is best dressed with a simple vinaigrette.  The stronger flavors in an herb salad also work with a mild creamy dressing.

My favorite salad dressing for herb salads is a balsamic vinaigrette made with extra virgin olive oil, balsamic vinegar, a bit of maple syrup and salt.

To make a complete meal, I add feta cheese and cooked chicken to the salad (omit salt in the salad dressing if adding feta cheese or olives to your salad).

The young spring herbs are mild, sweet and tender, making them a perfect addition to salads.

As the herb plants mature in the summer heat, the leaves become tougher and the herbal flavor becomes stronger.  Some herbs also develop bitterness as they mature.  The flavor profile often becomes too strong to use as a salad green.

So take advantage of the spring offerings in your herb garden, and build your own unique spring herb garden salads!

Happy growing,
Herb Garden Gal

Copyright © 2011 www.HerbGardenGal.com.  All rights reserved.

Spring Chives in the Herb Garden

May 9th, 2011
Chive Volunteer Plants

Chive Volunteer Plants

Spring has been slow to warm up this year.  But that hasn’t stopped the chives from dutifully popping up.

My chives are the first garden herbs I look for each spring.  And I can’t wait until they’re grown to pick them.

At one inch tall, I carefully pinch off a few new chive leaves to add to my omelet.  Luckily, the chive plants don’t seem to mind, and I have an abundant crop of chives in my garden within a couple of weeks.

Spring Chive Plant Volunteers:

If you left the seed heads on your chive plants over the winter as I often do, you may have small patches of chives popping out in other areas of your herb garden near the mother plant.  This is the easiest way I know of to increase my supply of chives — let mother nature do the work!

Leave the young volunteer chive plants where they have self-sown in the garden, or carefully transplant them to another location.  If you don’t want the new chive plants, cut them down and eat them.  Or share the young chive plants with a friend or two.

Culinary Versatility of Chives:

In the spring, the chive leaves are tender with a mild onion-like  flavor.  Because of their mild onion flavor, chives can be added to almost any dish in the final stages of cooking, or sprinkled on top just before serving.

Favorite culinary uses for chives :

  • Add finely chopped chives to salad dressings
  • Toss snipped chives in with salad greens
  • Stir chopped chives into soups and stews just before serving.  The chives brighten up these hearty dishes
  • Add chives to omelets, quiches, deviled eggs.  Chives pair very well with egg dishes.
  • Mix in chopped chives with tuna salad/filling for a hint of spring in tuna sandwiches
  • Add chives to steamed vegetables
  • Add chopped chives to stir-fries or fried rice.  This is a great way to use chives later in the summer, when the leaves are tougher.

And my all-time favorite way to enjoy the first chives of spring:

  • Boil Yukon Gold potatoes until tender.  Drain.  Add in butter, very finely chopped young chives, and a bit of salt.  Toss gently until the butter is melted.  Just that touch of heat from the potatoes releases more flavor from the chives.  The chives also gently infuse the butter with a hint of chive flavor.

Ahh, spring on a plate.

What is your all-time favorite way to enjoy chives?

Happy growing,
Herb Garden Gal

Copyright © 2011 www.HerbGardenGal.com.  All rights reserved.

Italian Herb Garden – Storing Herbs Part 2 – Drying Italian Herbs

September 24th, 2010

As your Italian Herb Garden grows, you will want to preserve your herbal bounty for winter use.

Drying your herbs for winter use is a simple process.  Do not be overwhelmed by instructions that make it sound complicated, or require you to purchase specialized equipment.

Home gardeners have been drying herbs for winter use for centuries without any specialized equipment.  So relax, and let nature do its. work.

Harvesting Italian Herbs for Drying

The best time to harvest fresh herbs is in the morning, just after the dew has dried on your herb plants.  Although if your schedule is not conducive to harvesting herbs in the morning, pick them whenever you can.

Also, herbs generally have the best flavor just before they start to flower.  The flavor of the herbs tends to get stronger and the leaves tougher once the plant begins to bloom.

So, what if you’ve been away and your herbs have already flowered, maybe even have seed heads?  Go ahead and dry them!  Personally, I feel that the ‘perfect time’ for harvesting herbs is overrated anyway.  The character of the older herb plants may be a little different than the younger herbs, but I’ve dried herbs in various stages of their growth and am always glad I did.

Snip off a bunch of stems or leaves for preserving.  If you plan to continue growing and harvesting from your herb plant, harvest no more than one-third of the plant to ensure your herb plant will continue to thrive, and you can continue to harvest fresh herbs to use in your Italian cooking.

If you will not be overwintering your herb plants, and you are done with using the herbs fresh for the season, cut the entire plant down to preserve it for winter use in your Italian cooking.

Methods for Drying Italian Garden Herbs

If your harvested herb plants are dirty, rinse and dry them gently.  I don’t suggest patting them dry, or using a spinner as those methods tend to bruise the leaves.

Method 1 – Air Drying Your Herbs

Lay out the leaves in a single layer, in a dry shaded area until the herb leaves are dry.  Make sure you keep the herbs out of sunlight to retain the best flavor.  Turn occasionally for even drying.

Flat Pan – Lay parchment paper or a tea towel on your flat pan (i.e. cookie sheet) so herbs don’t stick to the pan as they dry.

Drying Racks – Lay your herbs out to dry on drying racks — often made from window screening.  This allows for air flow both below and above the herbs, for quicker drying.

Hanging Bouquets – Tie a bunch of herb stems together, and hang them upside down to dry.  You can cover the herb bundles with a paper bag to keep them dust free.

Check the leaves often, and remove any that begin going moldy.  This is also an indication that the area does not have enough air circulation or is too moist for proper drying.

When air drying, I often place the herbs near a heating vent (but not right over it, or too close for the herbs to fly away), to get some air circulation.

Air drying is the easiest and most economical method of drying your Italian herbs.

Method 2 – Oven Drying Your Herbs

Lay out your herb leaves in a single layer on a flat pan (e.g. cookie sheet).  To prevent the herbs from sticking or reacting with the metal pan, line your pan with parchment paper.

Set your oven to the lowest setting, and check herbs for dryness every hour.  You can gently turn them over for faster, more even drying.  Be careful not to break the leaves too much.

If your oven does not go below 200°F / 95°C, leave the oven door slightly ajar when drying.  Using higher temperatures may bake the herb leaves rather than drying them.

This process can take up to four hours for thicker leaves.

Method 3 – Dehydrator Herb Drying

Dehydrators do an excellent job of drying herbs.  Follow the herb drying instructions that come with your dehydrator.

Method 4 – Microwave Herb Drying

Place your herb leaves between two sheets of paper towel.  Microwave on high for 1 minute.  Check and keep microwaving and checking every 30 seconds, until the herb leaves are dry.

The microwave method of herb drying works great when you have a relatively small quantity of herbs to dry at once, no space to lay out sheets of drying pans, or no time for the other methods.

Personal note:  I was skeptical about using the microwave for drying herbs when I first learned about the method.  So, I tried it.  And it worked much better than I had anticipated.  I dried a bunch of basil leaves in the microwave, and not only did they dry quickly, the basil also retained its bright green color.

Test Your Herbs for Dryness

Always test your herbs for dryness before storing.  They should feel brittle and crumble when rubbed between your fingers.  If the herbs do not crumble between your fingers, or there are some soft pieces remaining, then the herbs are not dry enough yet.

Storing Your Dried Italian Herbs

When your Italian herbs are dry, store them in an airtight container.  By storing the herbs whole, you will preserve more of the herb flavor.  Rub the herbs between your fingers or palms when you use them.

I like to use the glass canning jars, as they are convenient and easy to store.  And they are inexpensive to purchase.

Check your dried herbs occasionally to make sure they are not starting to go soft, meaning they are absorbing moisture.  If you cook regularly with your dried herbs, you will know when you use them whether they still crumble easily.  For herbs you use on occasion only, make a point of checking them every so often.

To further ensure that your dried herbs stay dry throughout the winter, you can add one of the following to your storage jar with your herbs to help absorb any excess moisture:  dry powdered milk, rice kernels, silica gel packet.

Most importantly, use the Italian herbs you so lovingly dried in all your winter cooking.

Happy growing,
Herb Garden Gal

Copyright © 2010 www.HerbGardenGal.com.  All rights reserved.

Italian Herb Garden – Storing Herbs Part 1 – Harvest and Fresh Herb Storage

September 8th, 2010

As your Italian Herb Garden grows, you will want to pick your herbal bounty often for use fresh.

The best time to harvest fresh herbs is in the morning.  Although if your schedule is not conducive to harvesting herbs in the morning, harvest them whenever you can.

Also, herbs generally have the sweetest flavor, and most tender leaves before they start to flower.  However, if that gorgeous basil in your Italian herb garden insists on blooming, there’s no need to give up on it.  We continuously harvest basil, oregano and many other herbs, for as long as we can. 

And the petite herb flowers are just fine thrown into a salad, garnishing a dish, or chopped right along with the rest of the herb.  Mix in some chopped herb flowers into your favorite Italian herb dressing for added flavor.

Harvesting Fresh Italian Herbs

For the freshest possible herbs, snip off the leaves as you need them.  If your Italian herb garden is outdoors, you can snip small bunches of herbs to be used within a day or two.

When harvesting a larger quantity of herbs, the rule of thumb is to harvest no more than one-third of the herb plant.  This ensures your plant will continue to thrive.

By the way, if there is danger of frost, and you will not be overwintering your herb plant, just go ahead and cut the entire plant down, and preserve it for winter use in your Italian cooking.  Visit my blog entries for Drying Italian Garden Herbs and Freezing Italian Garden Herbs to learn how to preserve your herbs for the winter.

Fresh Storage of Italian Garden Herbs

There are two methods that work well for storing herbs fresh:

1.  Loosely Wrapped in Refrigerator

Rinse fresh herb leaves gently.  Shake off the excess water, and gently wrap your herbs in a paper towel, while still damp.  Place your wrapped Italian herbs in a container or plastic bag, and store in the refrigerator.  This is the method I use most often to store my fresh garden herbs.

If you want to dry off your herbs before storing them, leave them out in a colander for a few minutes, turning them occasionally.  I don’t recommend patting leafy herbs dry before storage because the herb leaves are so easy to bruise, causing quicker spoilage.

You can also leave your herbs unwashed and store them this way.  Give them a quick rinse just before adding to your favorite Italian dish.

2.  Stems Immersed in Water

As soon as you harvest your herbs from the garden, immerse the stems in a container of water.  Cover herbs loosely with a plastic bag, and store in the refrigerator or a cool area on your counter. 

If you are bringing leafy Italian herbs home from the supermaket, cut a little bit off the stem bottoms before immersing them in water.

As much as possible, try not to immerse the leaves of the herbs in the water, as they will quickly turn slimy.  Stripping the herb leaves near the bottom of the stems solves this problem.

    
Our lives tend to be so busy.  It is easy to have great intentions to harvest fresh Italian herbs from the garden just before cooking.  And then, when the time restraints for getting dinner on the table kick in, we pass up on using those fragrant Italian herbs from our gardens.

By having your fresh Italian herbs close at hand, you will use them more often.  And that’s what growing and enjoying your Italian herbs is all about.

Happy growing,
Herb Garden Gal

Copyright © 2010 www.HerbGardenGal.com.  All rights reserved.

From Italian Herb Garden to Italian Kitchen – Italian Flat-Leaf Parsley

August 11th, 2010


Part of the fun of growing your own Italian herb garden is going outside and picking fresh herbs as you need them in recipes.  This is really my favorite part.

From your Italian Herb Garden, to your Italian, or just about any other, kitchen, Italian Parsley is indeed a very versatile herb.

Parsley is a staple in so many Italian savory recipes.  And as such, I wanted to showcase my favorite use for Italian Parsley in my kitchen.  Hope you enjoy it too.

My favorite recipe using Italian parsley in the kitchen is my daughter’s non-recipe for pesto.  My daughter loves Italian food, and was craving pasta with pesto sauce.  She wanted to make her own pesto, but the basil was in short supply in the garden.  I picked whatever basil I could, and picked fresh parsley to round out the bunch.

When she got the herbs, she just went to it, chopping up the basil, parsley and garlic.  And the end result was wonderful!  Not as smooth as grinding in a mortar and pestle, or in a food processor, but it taught me a lesson that:  it doesn’t have to be made with the ‘perfect appliance’ to taste really good.

Quantities in a pesto recipe are so forgiving, that you can use what you have and adjust to your taste preference.

If you already have a favorite pesto recipe,  substitute all or part of the basil with Italian flat-leaf parsley.    It provides a wonderful, fresh flavor to the pesto.

Here’s Natalie’s non-recipe for pesto:

Natalie’s Parsley and Basil Pesto

No food processor, no mortar and pestle required.
The quantities are a guideline.  You can adjust them to taste and availability.

1 generous bunch mixed Italian flat-leaf parsley and basil – you can also use all parsley or all basil
1 clove garlic (or 2, or 3, or…..–> OK, we never use just 1 clove in our family)
Extra virgin olive oil
1/3 cup grated Parmesan cheese
Pine Nuts – optional.  Natalie does not add pine nuts to her pesto

Finely chop the Italian parsley, basil and garlic.  And a handful of pine nuts, if using.

If you want a finer result, sprinkle a little bit of salt on the cutting board while chopping to help the ingredients break down.  If you  smash up the garlic and pine nuts before chopping with the rest of the ingredients, they will incorporate faster, and the pounding is therapeutic on a stressful day.

By all means, if you prefer to use a mortar and pestle or your food processor, they work great in breaking down the ingredients into a smoother pesto sauce.

Once you have everything chopped finely,  pour in enough olive oil to make a paste.

Mix in parmesan cheese.  This quantity, too, is not cast in stone.  If you like more, add more.  If there’s only a bit leftover from a previous meal, add that.  If you are not a cheese person, leave it out altogether.

If the mixture is too thick, stir in a bit more olive oil.

Optional:  Season with salt and pepper.  Taste first, because the pesto may be salty enough from the parmesan cheese, and you may have added salt when chopping the ingredients.

That’s it! Fresh pesto from Italian parsley and basil picked from your own herb garden.

Variations:

  • Omit parmesan cheese for a stronger, brighter herb flavor
  • Use romano cheese rather than parmesan cheese
  • Omit pine nuts
  • Replace pine nuts with  almonds, walnuts, or pistachios
  • Change-up the herbs used.  Suggestions:
    parsley and cilantro
    parsley, basil, mint
    parsley and tarragon

Pesto is very versatile.  Here are some ways we use it in our kitchen:

  • Mix into freshly cooked pasta
  • Toss with cooked chicken
  • Better yet, mix with chicken and pasta for a meal
  • Serve alongside roasted or barbecued meats
  • Omit the cheese from an all-parsley pesto, and toss with shrimp or scallops
  • Spread on baguette slices and toast lightly for a tasty appetizer

Making your own pesto is very easy, it’s a super way to save money, and the taste is wonderfully fresh.  You can adjust the ingredients to suit your taste, and use the freshest herbs in season from your Italian herb garden.

Buon appetito!

Happy growing,
Herb Garden Gal

Copyright © 2010 www.HerbGardenGal.com.  All rights reserved.

Italian Herb Garden – Grow Italian Parsley Herb

July 27th, 2010

The herb parsley is a staple in Italian herb gardens, as well as in just about any herb and vegetable garden.  It is a versatile herb used in many cuisines.   For cooking, Italian flat-leaf parsley is preferred as it has a more pronounced flavor than the curly leaf parsley.

Growing your own Italian Herb Garden is the essence of the best Italian cooking.  And Italian parsley is an easy herb to grow in any garden.

Parsley is a compact and bright green herb, great for the border of your Italian herb garden.

Botanical name:  Petroselinum crispum

Growing parsley in your Italian Herb Garden:

Parsley can be sown directly in the garden in spring, or sown earlier in pots and then transplanted into the garden.  Although parsley is not supposed to transplant well, I’ve had no problem transplanting young plants from pots into the herb garden, or into larger garden planters.

Seeds can take 3 to 4 weeks to germinate, sometimes longer.  To speed up germination, soak seeds overnight before sowing.  Thin seedlings to 8 inchces (20 cm) apart.

Parsley is a hardy biennial, meaning it grows the first year and goes to seed in its second year.  Most people however treat parsley as an annual, planting new plants every year.

Parsley grows about 1 to to 1 1/2 feet high.

Grow in full sun to partial shade.

Grow parsley easily in the Italian herb garden, on a windowsill, even indoors in a cool room.

Italian flat-leaf parsley also grows nicely in pots.  Grown in containers, parsley plants can be brought indoors over the winter.  What could be better than parsley in your own indoor Italian herb garden in the middle of winter.  The parsley herb has a deep root, so deeper pots are better to accommodate the root.

Parsley is a hardy herb that can handle light frost, and I have harvested it in my herb garden after a light snowfall.  I leave my parsley in the herb garden over winter, and enjoy fresh green leaves in the early spring after the snow has melted.

Once the parsley plant goes to seed, I let the seed drop, and most years am delighted with a small crop of ‘volunteers’ that form a new crop of Italian parsley in my herb garden.  To delay the parsley plants going to seed, cut off the flower stalk when it appears in the second year.

Italian flat-leaf parsley is an easy-to-grow must-have for any herb garden.  Whether you are growing an Italian Herb Garden, or adding a few herbs to your kitchen garden, be sure to include the Italian flat-leaf parsley herb.

Happy growing,
Herb Garden Gal

Copyright © 2010 www.HerbGardenGal.com.  All rights reserved.

Grow Your Own Italian Herb Garden

July 14th, 2010


Why grow your own Italian Herb Garden?

Fresh and dried herbs are prevalent in Italian cooking.  These herbs that give Italian food their character, their vibrancy. 

The combinations of Italian herbs is what makes Italian cuisine one of the most popular cuisines around the world.

It’s easy to grow the freshest herbs at home in your very own Italian herb garden.  You will have the most flavorful herbs at your fingertips, ready to add to your Italian dishes.

The most popular herbs grown in Italian herb gardens are:

Basil
Oregano
Parsley
Rosemary
Sage
Bay Leaves
Garlic
Marjoram
Fennel

When planning your Italian Herb Garden, choose the herbs that you use most frequently, or grow them all and experiment with the herbs you are not as familiar with.

As you look at the list of garden herbs that make up a typical Italian herb garden, it’s interesting how many of these herbs are also popular in other cuisines around the world.

Over the next series of posts, we will examine each of these Italian herbs in much more detail.  Stay tuned…

Happy growing,
Herb Garden Gal

 Copyright © 2010 www.HerbGardenGal.com.  All rights reserved.